using UnityEngine;

public class NowBound : MonoBehaviour
{
    private MovingObjcet thePlayer;
    private CameraManager theCamera;
    private BoxCollider2D theBoxCollider2D;

    // Start is called once before the first execution of Update after the MonoBehaviour is created
    void Start()
    {
        theCamera = FindAnyObjectByType<CameraManager>();
        thePlayer = FindAnyObjectByType<MovingObjcet>();
        theBoxCollider2D = this.GetComponent<BoxCollider2D>();
    }

    void OnTriggerEnter2D(Collider2D collision)
    {
        if(collision.gameObject.name == "Player")
        {
            theCamera.SetBound(theBoxCollider2D);
        }
    }
}
7장의 공략에서는 바운드를 여러가지 방식으로 복잡하게 구성해주었다
하지만 위의 NewBound처럼 박스콜라이더에 있는 플레이어 오브젝트를 포착해서
MainCamera의 바운드 값을 바꿔주는 스크립트를 짜서 넣었다
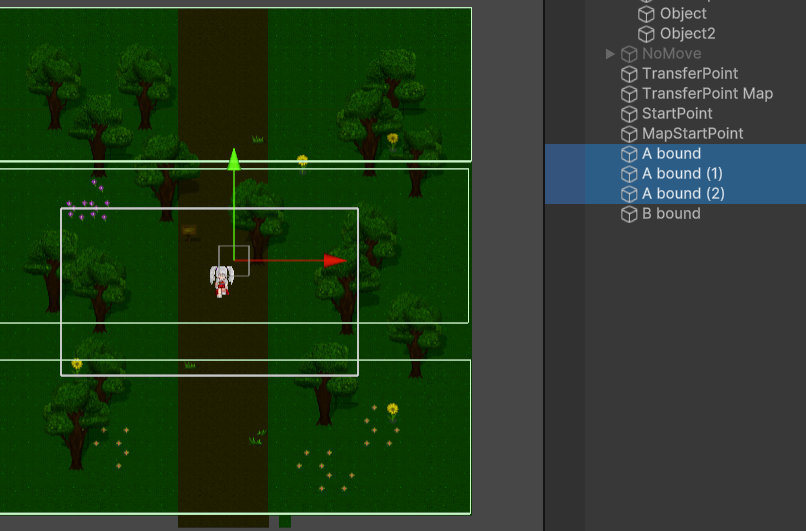
짜잔 그랬더니 바운드가 정상적으로 바뀌는 것을 볼 수 있습니다
using UnityEngine;

public class CameraManager : MonoBehaviour
{
    static CameraManager instance;

    public GameObject target;//카메라가 따라갈 대상
    public float moveSpeed;//카메라가 얼마나 빠른 속도로 대상을 추적할지
    private Vector3 targetPosition;//대상의 현재 위치 값

    public BoxCollider2D bound;//카메라 시야 범위

    private Vector3 minBound;//최소 시야범위
    private Vector3 maxBound;//최대 시야범위
    //박스 콜라이더 영역의 최소 최대 xyz값을 지님

    private float halfWidth;
    private float halfHeight;
    //카메라의 반너비, 반 높이 값을 지닐 변수

    private Camera theCamera;
    //카메라의 반 높이값을 구할 속성을 이용하기 위한 변수

    private void Awake()
    {
        if (instance == null)
        {
            DontDestroyOnLoad(this.gameObject);
            instance = this;
        }
        else
        {
            Destroy(this.gameObject);
        }
    }

    // Start is called once before the first execution of Update after the MonoBehaviour is created
    void Start()
    {
        theCamera = GetComponent<Camera>();

        minBound = bound.bounds.min;//minbound값을 넣는다
        maxBound = bound.bounds.max;//maxbound값을 넣는다
        halfHeight = theCamera.orthographicSize;//반 높이 값
        halfWidth = halfHeight * Screen.width / Screen.height;
    }

    // Update is called once per frame
    void Update()
    {
        if (target.gameObject != null)
        {
            targetPosition.Set(target.transform.position.x, target.transform.position.y, this.transform.position.z);

            this.transform.position = Vector3.Lerp(this.transform.position, targetPosition, moveSpeed * Time.deltaTime);
            //Time.deltaTime 초당 이동구현용 코드

            float clampedX = Mathf.Clamp(this.transform.position.x, minBound.x + halfWidth, maxBound.x - halfWidth);
            float clampedY = Mathf.Clamp(this.transform.position.y, minBound.y + halfHeight, maxBound.y - halfHeight);

            this.transform.position = new Vector3(clampedX,clampedY, this.transform.position.z);
        }
    }

    public void SetBound(BoxCollider2D newBound)
    {
        bound = newBound;
        minBound = bound.bounds.min;//minbound값을 넣는다
        maxBound = bound.bounds.max;//maxbound값을 넣는다
    }
}
카메라 오브젝트의 스크립트도 살짝 수정해줬다
인스턴스를 필자가 보기 좋게 수정했다
using UnityEngine;

public class TransferMap : MonoBehaviour
{
    public string transferMapName;//이동할 맵의 이름

    public Transform target;
    //public BoxCollider2D targetBound;

    private CameraManager theCamera;
    private MovingObjcet thePlayer;
    // Start is called once before the first execution of Update after the MonoBehaviour is created
    void Start()
    {
        theCamera = FindAnyObjectByType<CameraManager>();
        thePlayer = FindAnyObjectByType<MovingObjcet>();//다수객체에서 MovingObjcet를 찾아온다
    }

    // Update is called once per frame
    private void OnTriggerEnter2D(Collider2D collision)
    {
        if(collision.gameObject.name == "Player")
        {
            thePlayer.currentMapName = transferMapName;
            //theCamera.SetBound(targetBound);
            //theCamera.transform.position = new Vector3(target.transform.position.x, target.transform.position.y, theCamera.transform.position.z);
            //카메라 스크립트의 경우 필자가 수정했다(플레이어 포지션.x ,플레이어 포지션.y, 카메라 포지션.z)로 이동하게 함
            thePlayer.transform.position = target.transform.position;
        }
    }
}
TransferMap 스크립트의 경우 맵에 있는 카메라를 자꾸 이상하게 인식하는 문제가 있어서
필요 없는 부분은 주석으로 바꿔줬다!
'쯔꾸르식 유니티 게임 공부' 카테고리의 다른 글
| 09.BGM매니져(배경음) (1) | 2025.01.03 |
|---|---|
| 08.오디오 메니져 만들기 (0) | 2025.01.03 |
| 07.카메라를 영역을 맵 화면으로 제한하기 (0) | 2025.01.01 |
| 06.맵과 맵을 이동하기 (0) | 2024.12.31 |
| 05.2D맵제작하기 (0) | 2024.12.31 |